Endodontics refers to a dental treatment. Most people visiting an endodontist do so to have the nerves of a tooth removed: a root canal treatment.
Often this is the best and only way to save the tooth.
What is endodontics?
The word endodontics is derived from ancient Greek and consists of two parts: endon [within] + odōn [tooth]. Although the name endodontics encompasses an entire field of specialized dental surgery, the vast majority of people will see an endodontist for a root canal treatment.
An endodontist brings relief from the agonizing pain caused by an abscess or infected dental nerve. Pain relief is achieved by completely removing the nerve from the root canal. Therefore endodontics is virtually a synonym for root canal treatment or root canal therapy.
When do I need to see an endodontist?
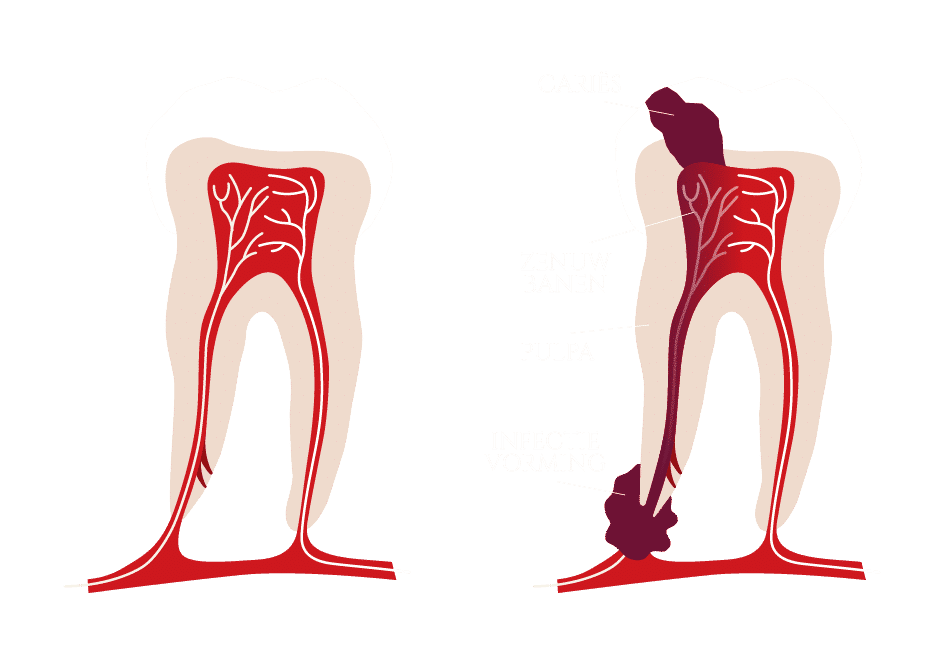
Roughly speaking there are four routes to our dental chair: (1) an abscess, which is an infection at the root of a tooth causing pressure, and hence pain; (2) an unfortunate, nasty fall or a fierce bar brawl that ended up exposing the nerve of a tooth; (3) an infected tooth nerve by grinding your teeth, a deep dental filling or dental crown and bridgework; (4) a retreatment, sometimes years or decades after you had an issue in one of the categories above.
Most of our patients are referred to us by their own dentist. Do you feel the need to swing by on your own accord? That’s a bit odd. One might suspect you have a tooth fetish. Even if you were not referred to us by your own dentist, we might be able to help you. So, you’re welcome if you book an appointment, just as all the other patients do.
What are the 10 steps of an endodontic treatment?
Step 1 — Briefing
Imagine you were to see your urologist or gynecologist and that he or she immediately — without any warning or information whatsoever — invites you on the treatment table and shoves a camera or speculum in your body. That would be absurd. In our dental care clinic, we value clear and concise information, too. Before we begin, we make ample time to inform you about the endodontic treatment procedure and are happy to answer all your questions.
Step 2 — Anesthetics, yay!
Good grace it’s the third millennium: we have great anesthetics at our disposal, which ensures the root canal treatment is virtually painless for most people.
Step 3 — Prep work:
positioning a rubber dam
Any root canal treatment requires a rubber dam. This is a necessary tool for the procedure. It creates a barrier to isolate the tooth we’re working on: it protects the tooth we’ll be working on against any infected saliva and it prevents endodontic irrigants from going places they need not be.
Often, the rubber dam provides a sense of security. It feels as if we’re working ‘outside’ the mouth. A small minority of our patients feels uncomfortable when the rubber dam is put in place. We’ll make sure to check you’re okay. In very rare cases we will have to stop the procedure due to anxiety or claustrophobia. If need be, we can reschedule the appointment and prescribe tranquilizing medication. That should do the trick.
Step 4 — Creating the access
Creating access to the root canal of a tooth is a noisy endeavor. But don’t be alarmed. It’s perfectly normal to experience vibrations, trembles, and jitters. It’s inevitable: your teeth are the hardest material in your body and we’re making our way to its root. You can moan, groan, or raise your hand to communicate.
Don’t be surprised by the unpleasant smell in this phase of the procedure. An abscess or an infected tooth does not bring forth the aroma of an orchid or a blossoming butterfly tree. Quite the contrary: it can smell quite pungent. That’s nothing to be ashamed of, it’s just a phase we’ll have to get through together.


Step 5 — Measuring and removing the nerve
Not every tooth has the same number of nerves. The endodontist maps the number of roots that need to be treated using a specialized cone beam CT-scanner when needed. Then the nerves are measured and removed, and the root canal is emptied out completely. This is precision work.
This is the only step in the procedure that might cause a painful sensation. If need be, we provide additional anesthetics to make things as comfortable as possible for you.
After this phase we can reward you for your courage and endurance: if you fancy it, we can show you the removed nerves. But only if you promise not to faint.
Step 6 — Cleaning the tooth
This is the most vital step of the procedure: removing all impurities down to the very tip of the root canal. All infected tooth structure and infected pulp will be removed. For this procedure of pulpal debridement, we use diluted sodium hypochlorite. This smell of this product might come across as unpleasant, but it helps to eliminate lingering bacteria and rinses the root canals.


Step 7 — Filling the root canals
After a thorough rinse, the root canals are filled with a bio-ceramic sealing.
Step 8 — Temporary filling
In most cases we will place a temporary filling to close the opening. This filling will be removed and replaced by your regular dentist when the tooth is restored. Your dentist will discuss the specifics of your dental treatment plan with you and will include the specifics in the referral letter. In case of emergency treatments, it’s common to opt for temporary fillings, too.


Step 9 — Protective crown
Your own dentist might want to add a crown to the tooth, too. This protects your tooth and restores its full function. Please be advised by your own dentist.
Step 10 — Check-up
After a complex trauma we might need to perform a check-up. These are scheduled 10 to 12 months after the original treatment.